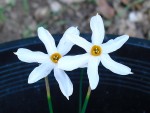
All, There is now a category especially for Autumn Blooming Daffodils under “Daffodil Types” on the menu bar. It is amazing how much discussion and photos have been shared about Autumn bloomers. Here is a photo of a couple of our week old N. serotinus blooms. Yesterday, these two had that wonderful “stardust” look on their petals. Our N. miniatus will probably be open the end of this week. Where would we get such wonderful daffs to grow? Harold, of course!
By the way, today’s Daffnet comment from Mark Smyth was really me attaching Mark’s comment to Brian’s original message. My apologies for any confusion!
Those of us in certain areas of California are fortunate to have to a 4 to 5-month daffodil bloom season.
Nancy


Thanks Nancy for explanation of the Mark Smyth message – it dis confuse me and I wondered how it re-appeared after so many years. Finally I’ve got logged in – now to learn how to attach pictures!!!! I don’t see an attachment icon in the menu bar above. I’ll try Insert/edit link??
brian
Hello Brian,
You are correct, it is the “Upload/Insert” button. Below are steps to put a single photo into a message. At first, this may look like quite a few steps, after a couple of times, it all adds up to a couple of clicks:
1. Place your cursor where you want the photo located in your message.
2. Click on the “Upload/Insert” button on the left above the Bold & Italics icons.
3. Drag and drop a photo into a box, or a browse screen to “Choose File” to browse your computer and Select/Open a photo and then Upload.
4. A screen will appear with a small thumbnail of your photo and boxes below. The “Title” box is important. The default title is the filename which will appear in the “Title” box. This is handy if prior to uploading, the photo was renamed to a title-like name. However, if you want to change contents in “Title”, enter information into the “Title” box then go to the bottom of the screen and click on “Save all changes”.
5. Some people have been having trouble with the final display of their post and images. The default settings for the “Upload/Insert” or “Add Media” page should show the “Link URL” choice set to “File URL” and “Medium” as the Size. If you ever change these settings, they become your new “defaults” so you might want to mouse-click the “File URL” button the first few times you post an image just to make sure of your defaults.
6. The last step is to go to bottom of this page and click on “Insert into Post”. All other settings on this page should already be set to link the URL to the File URL and display a medium size photo.
Then you can proceed to write your message and select one or more categories where you think your message will fit in best.
There is another method some use to upload multiple photos into a message. The Kiwis have been using the technique called “galleries”. However, if you want to do a Journal like Kirby Fong posted of his Down Under trip, with the photos placed near the text, it is best to load each photo individually so you can control the location to line up with the text.
I hope this helps,
Nancy